
Recipe for the perfect bacon?
Homemade bacon that surpasses supermarket versions by a mile is nothing short of a fact. A bacon that doesn’t splatter in the pan sounds a bit like a dream, doesn’t it? Yet, this is the pure reality with homemade bacon.
The efforts to achieve the perfect homemade bacon are somewhat akin to nurturing a relationship: It requires time and unlimited amounts of love and attention, and it’s a continuous learning process. Fortunately, I find immense joy in constantly trying to improve my own techniques and usual methods – well, now we’re back to the bacon!
When you also get tips and tricks from a bona fide Baconista (thanks to Allan Ømand Ungstrup for the awesome inputs!), it’s clear that it does not fall on deaf ears. Oh no, you listen!

I had never considered using a dehydrator as a cooking method.
Read on and find out if the dehydrator really is the way to the perfect homemade bacon!
The perfect bacon?
Equipment
- Dehydrator
Ingredients
- 1 pcs. Rib Roast
- 50 gram Nitrite Salt
- 150 gram Salt fine
- 85 gram Sugar
- 4 gram Peppercorns
Instructions
Salting/brining
- Before we bring out the dehydrator, the pork roast first needs to be prepared. If you already have a complete grasp of brining, you can of course skip this section.
- In this recipe, I chose to brine the meat in a mixture of salt, sugar, and pepper (dry brining) for three days.
- Find your mortar and add the peppercorns. Crush the peppercorns until they are broken. They do not need to be completely finely ground. If you do not have a mortar, you can certainly "settle" for using pepper from a grinder.
- Mix the pepper, salt, and sugar together.
- It's up to you whether you want to remove the ribs from the roast now. The advantage of removing them is that the meat, all things considered, is easier to slice later. It is not necessary to remove them, but I would recommend it. The time and effort are worth it as it makes your job easier later on. Massage the mixture of salt, pepper, and sugar thoroughly into the meat. It's important to be meticulous and thorough in getting into all crevices and holes. The mixture has an antibacterial effect, which prevents mold.
- The meat can now be brined in two ways:
- In a regular bag - Here, the meat is placed in an ordinary plastic bag. For hygiene reasons, it is important that the bag is sealed completely. The meat will release a lot of liquid during the salting process, and you want to avoid meat juices leaking onto other food in the fridge. If you use this brining method, the bag should be turned 1-2 times a day to distribute the liquid.
- Vacuum-packed - Here, the meat is placed in a vacuum bag, and the bag is vacuum-sealed. The bag is then refrigerated, and you don't need to do anything further with the bag during the salting process.
- I always use the latter method. Regardless of which method you choose, let the meat marinate for 3 days.
- After this, move on to the next step.
- Unpack the meat from the bag.
- Rinse the meat thoroughly under cold water. All the brine must be rinsed away to stop the brining process.
- Dry the meat with a clean cloth/tea towel. Place the meat on a plate. Put the plate with the meat in the refrigerator for 24 hours. The meat should not be covered. The reason for this is that the meat will become tacky on the surface. This allows the smoke from the upcoming cold smoking to adhere more easily to the meat.
- After 24 hours, take the meat out of the fridge.
- The meat should now be cold smoked. In practice, this means the temperature must be below 20 degrees Celsius (68 degrees Fahrenheit) but above freezing, and we typically work at temperatures between 15-22 degrees Celsius (59-72 degrees Fahrenheit). You can choose to use a dedicated smoking oven or your grill.
- Smoking in a grill - If you use this method, it is important that your grill can hold the smoke inside. Additionally, it is a good idea to do it in the evening:
- Cover the bottom rack of the grill with aluminum foil. Then place smoking dust on the foil: Arrange the dust in a horseshoe shape.
- Pour a little bit of alcohol in one end of the horseshoe and light it. Place the meat on the top rack and immediately cover the grill. In the morning, take the meat out of the grill and put it back in the refrigerator on a plate. In the evening, repeat the process. Repeat this process for 2-3 consecutive days.
- Smoking in a smoking oven - If you are one of those who has a proper smoking oven, the process is relatively simpler for you.
- Hang the meat.
- Light the smoking dust and close the oven.
- Let the meat smoke for about 15 hours.
- I personally smoke the meat using the grill method. Regardless of which method you have chosen, the meat is essentially ready to be cooked, and you can therefore move directly to the dehydrating step.
- But, but, but - since the nerd in me can't resist trying to make my bacon even better and even wilder, I always dry age it for 4 weeks afterward. I know: It takes willpower not to bite into it right away! However, the flavor develops to be more deep and concentrated over the four weeks, and the meat becomes firmer as even more liquid will evaporate during the dry aging process. And you know what they say about the anticipation of joy. Okay, we can maybe agree that nothing in this process really beats the joy of finally tasting your homemade bacon. Nevertheless, I am happy to wait for it to get even better 🙂
Dehydrating
- Now for the the grand finale!
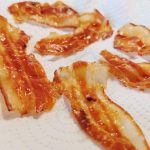
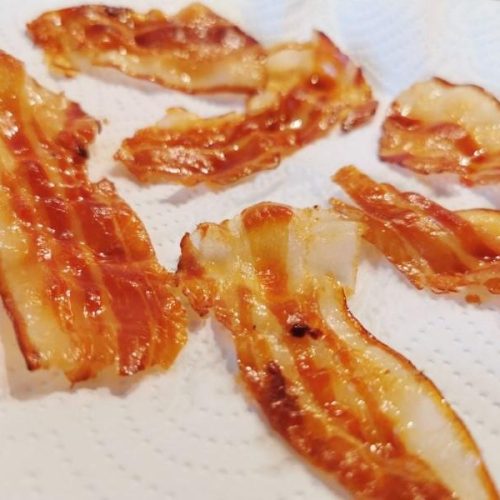
- First, cut the meat into thin slices, and you can advantageously use a slicer.
- The tip from Allan Ømand was that the bacon should dehydrate at 67 degrees Celsius (153 degrees Fahrenheit) for 5 hours.
- However, my dehydrator can only be set in intervals of 5, which means either 65 or 70 degrees Celsius (158 degrees Fahrenheit). I decided to set it at 65 degrees Celsius (149 degrees Fahrenheit).
- After 5 hours, I felt the bacon still lacked a bit of crispiness - possibly due to the lower temperature than recommended. Therefore, I decided to give them a short time in the pan at the end. Just 1 minute on each side.
- Next time, I must try setting the temperature to 70 degrees Celsius (158 degrees Fahrenheit) instead!
- Regardless, the bacon turned out fantastic, and it is without a doubt the best bacon I have tasted to date.