

Hunting as a Hobby and Lifestyle

Hunting has become a hobby and lifestyle for many people today. Witnessing the taking down of a beautiful and noble animal can be a grand, almost poetic, experience.
Venturing into the Danish forests and meadows, sharpening the senses and becoming one with nature, can not only be a fantastic sensory and immersive experience: What was once a necessity for survival is now also a way for us to regulate an animal population.
Keeping the population of a given species down is, among other things, a way to reduce hunger and disease risks that can arise when an area’s animal population becomes too dense. Dense populations are also a stress factor for the animal, which in such cases uses a significant amount of energy keeping other animals out of its habitat/territory. This is, after all, energy that is taken from the animal’s energy reserves.
Besides being a hobby filled with excitement and adventure, hunting is also a way for us to optimize the species’ health.
However, compliance and submission to both legislation, respect for hunting ethics, and good hunting morals are prerequisites for the continued acceptance of hunting in Danish nature.
About Roe Deer
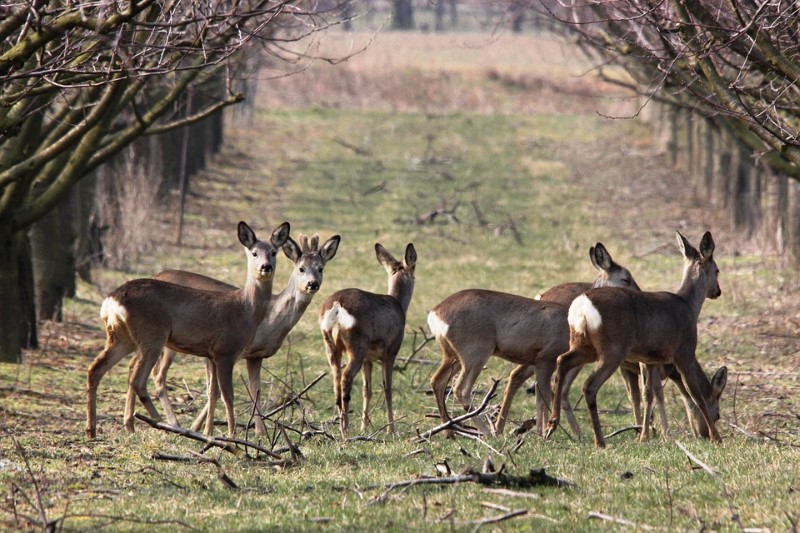
The roe deer – or roe – measures between 90-130 centimeters in full length and 65-75 centimeters in shoulder height, with an average weight of 20-23 kilos.
As the smallest of the original deer species throughout Europe, the roe deer is also the most widespread deer species in Denmark. It is estimated that there are up to 500,000 roe deer here, and we have found roe deer bones that are up to 8,000 years old.
The roe deer is among the very adaptable species and generally thrives in places with good opportunities for grazing and cover, which is why its preferred habitat is a mix of open areas and forests. Roe deer are found all over the country, with the exception of a few smaller islands.
It is amazing to observe the changes in the roe deer’s behavior and appearance throughout the year. In winter, roe deer move together in larger or smaller herds, also called “spring.” Here, the animal’s fur is gray-brown, and the mirror is white. In summer, when the fur is red-brown with a more yellowish mirror, larger bucks do not stay within the same territory, as they view each other as competitors during this period. However, young bucks are accepted under a territory as long as they do not display competitive behavior.
Roe Deer Season and Hunting Times
Every year, approximately 100,000 roe deer are culled domestically. Despite this, the population remains stable, and in certain areas even steadily growing: The roe deer population has overall grown significantly over the past 40 years.
The spring and summer season for buck hunting starts from May 16th to July 15th. Here, hunting always takes place with a rifle.
The roe deer season, where both bucks (males), does (females), and fawns can be shot, runs from October 1st until the end of January.
As the amount of withered foliage increases, it becomes correspondingly more difficult to stalk the animal, so the hunter typically takes down the animal from a distance, positioned in a tower or hunting stand.
Hunting is also associated with a wealth of customs. Did you know there is a tradition for the hunter, after taking down their first buck, to smear the blood from the wound on their forehead?
Always remember to check your hunting area’s possible separate seasons and other general regulations before heading out. For example, it is an unwritten rule that the old doe is not shot in the first part of the roe deer season, as her potential fawns would struggle to survive without their mother.
Butchering / Fine Butchering

One could argue that if you have the courage to shoot a roe deer, you also have the courage to butcher your catch. After the animal is downed, it must be gutted and skinned before being butchered, and there’s nothing to do but dive into it. Practice makes perfect, and then the whole experience is complete and taken to a whole new level.
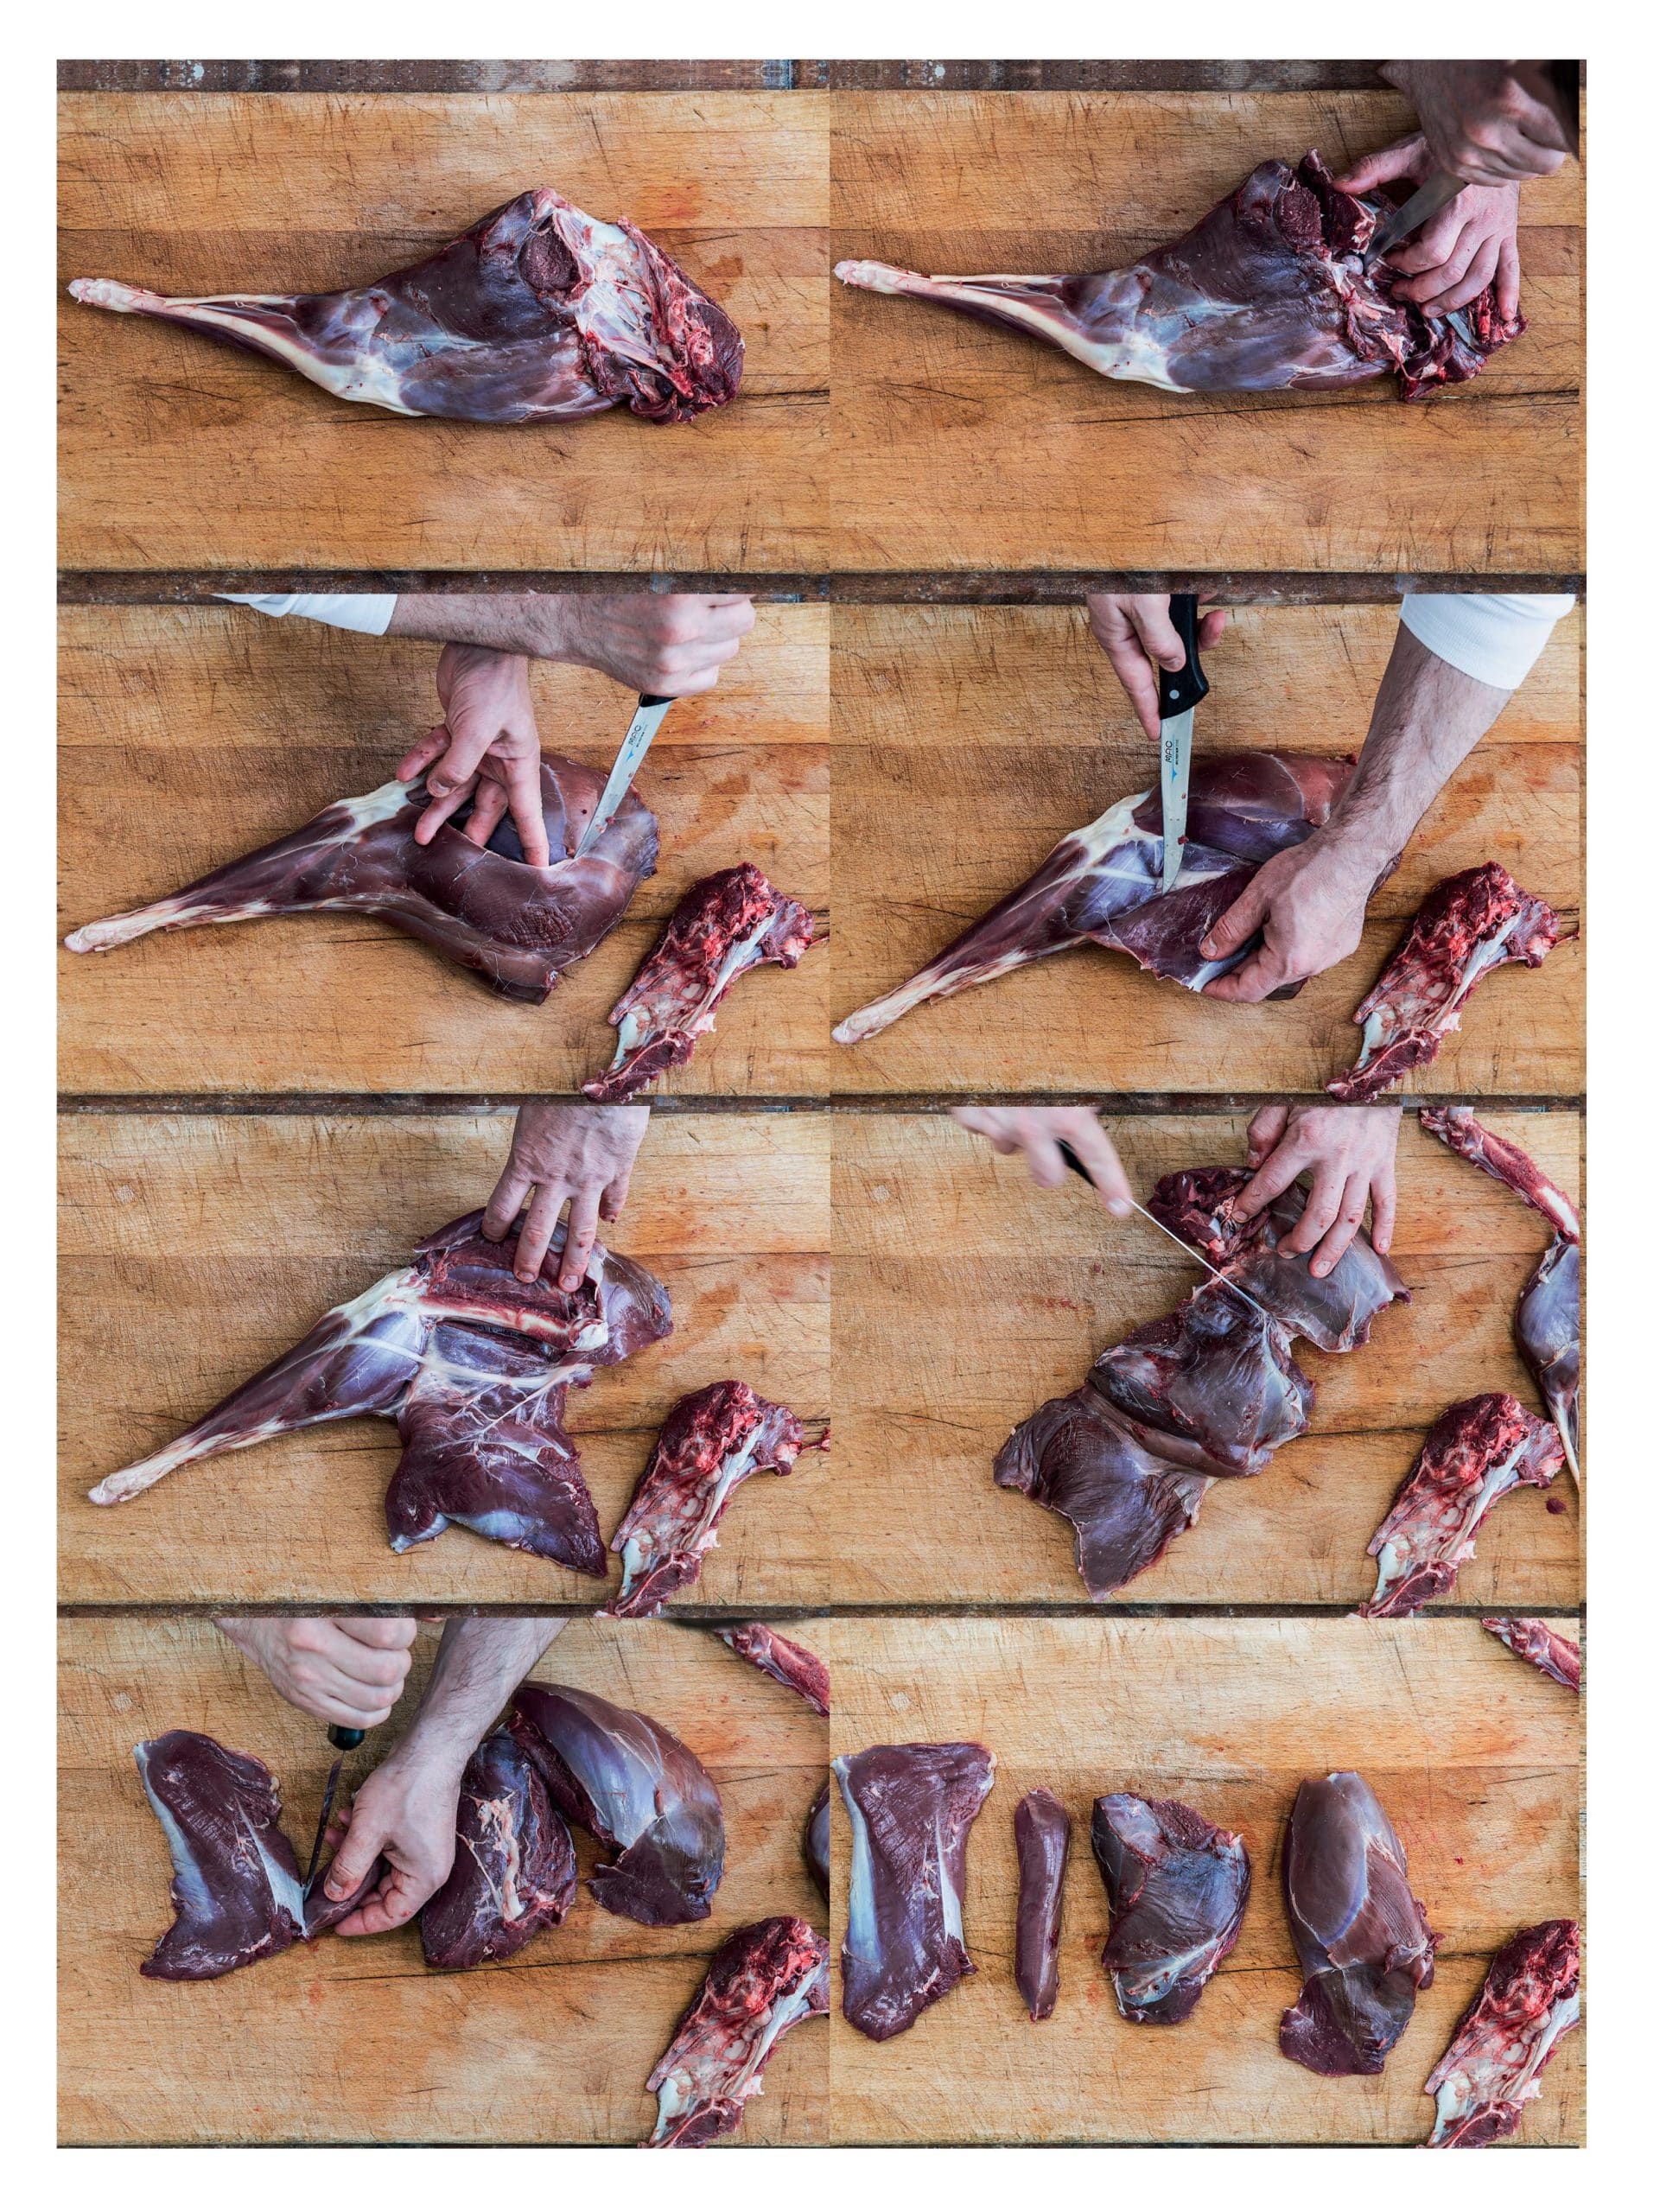
During the rough butchering, the haunches are cut free from the back by first making an incision into the hip joint, then prying the joint ball out of the hip socket. The venison leg is then ready for fine butchering.
It is clearly advantageous to fine butcher the venison leg into individual muscles, both so that cooking is faster and so that some muscles are not overcooked along the way.
We work here with the following muscles of the venison leg:
- Inner thigh
- Outer thigh
- Sirloin
- Knuckle including shank and thick flank in one
Since each muscle is clearly defined and wrapped in membranes, making them easy to identify, the fine butchering is relatively straightforward.
Whether you have downed the animal yourself, or you have purchased the whole venison leg from the butcher, the butchering is not an entirely insurmountable task.
In the following, we guide you through the deboning and fine butchering of the venison leg, and we also show you the trimming of the outer thigh.
Be aware that there is a gland in the venison leg located under the knee joint. This should always be removed, although we do not address it further in this guide.
Butchering Guide
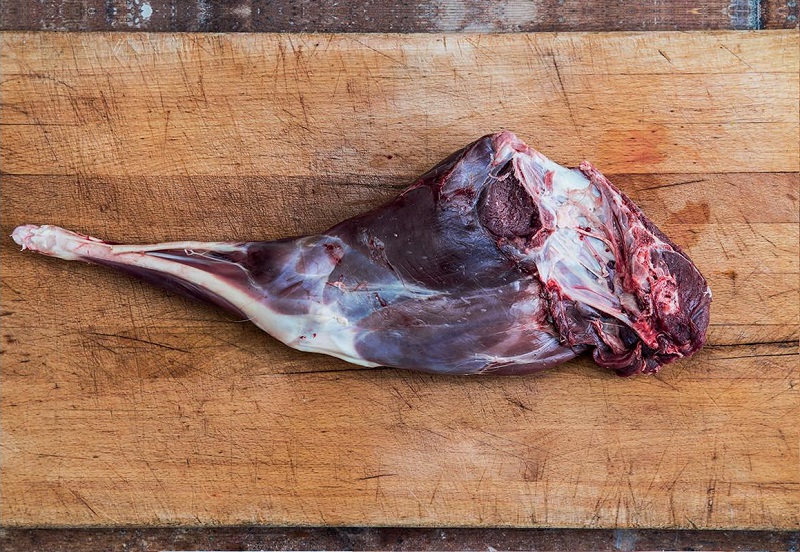
Find a good, sharp, and pointed boning knife to butcher and debone the venison leg.
Place the venison leg with the outer thigh down on the work surface. On the left of the image is the shank, while the neck bone is located on the right at the opposite end of the leg.
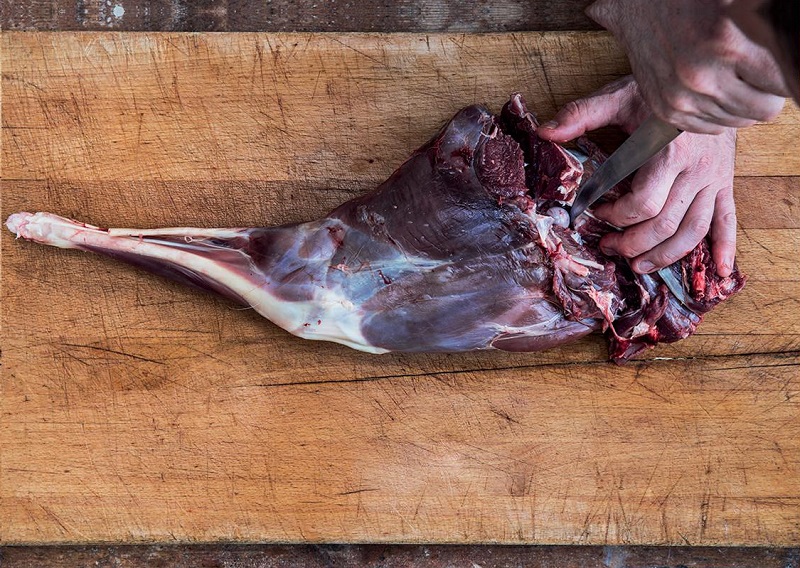
To access the muscles, the neck bone must first be freed from the leg. Feel with your fingers to assess where the neck bone lies, and thus where you should place your first cut.
Start at the top end of the leg and make an incision along the neck bone by cutting slowly until you can grip the meat with your fingers. Hold with your fingers and let the knife in the other hand work along the neck bone while you steadily and gently pull on the meat with your fingers.
Constantly feel the meat to get an impression of where the bone lies under the muscle so that you do not remove unnecessarily much of the good meat.
Continue until you reach the femur bone. Here you need to hit just above the ball joint, which is still hidden under the neck bone.
Wait to cut the joint over, but continue to slice along the rest of the neck bone. Make a deeper cut here until you reach the end.
Pull on the neck bone so you see the ball joint (the ball-shaped top of the femur bone). Let the tip of the knife work down here and pry the neck bone a little free of the ball joint while you continue to pull well on the neck bone.
Cut close to the ball joint and through the cartilage. Continuously run the knife as close to the neck bone as possible and pull on the neck bone so you can see where you’re slicing.
The neck bone can now be virtually pulled off while letting the knife work. Let the femur bone and ball joint slip the neck bone.
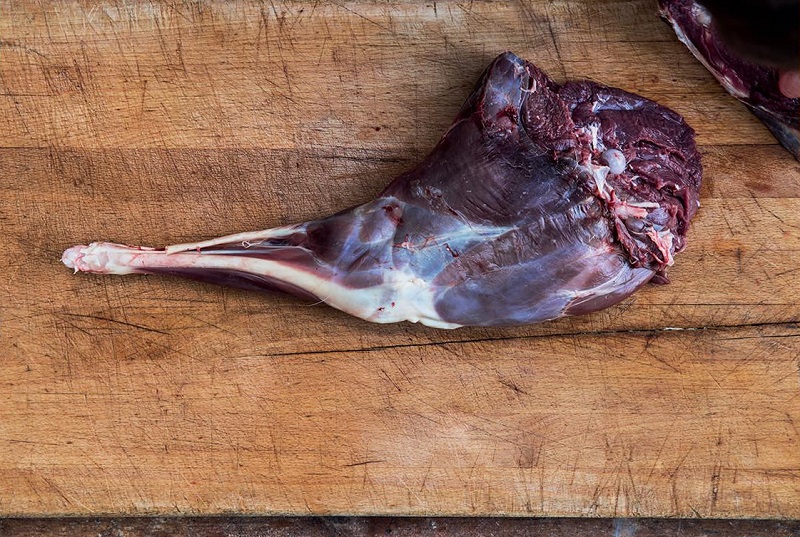
You have now removed the neck bone, and the ball joint is exposed.
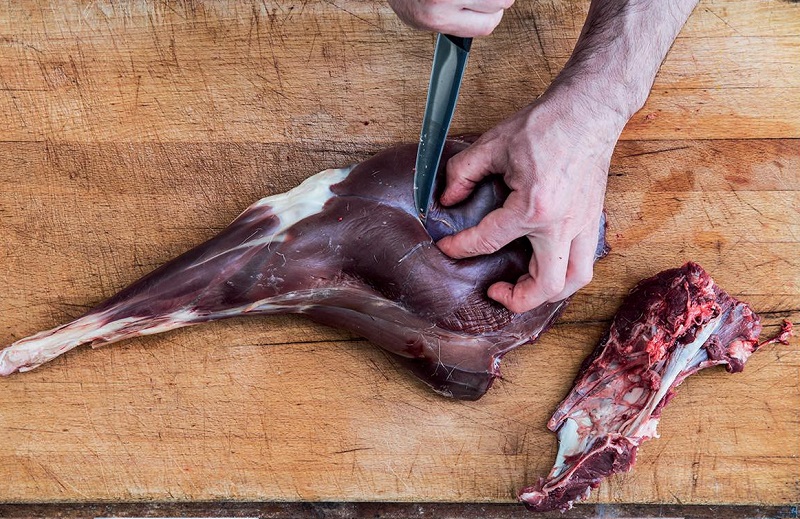
Then turn the leg over so the exposed ball joint faces down on the table and the outer thigh faces up. The knuckle is now placed at the top of the image, while the sirloin is placed at the bottom of the image. Between the two lies the outer thigh, and under this runs the femur bone, which now needs to be exposed and removed.
Start separating the knuckle and outer thigh by slowly slicing with the knife’s tip along the membrane that clearly separates the two from each other.
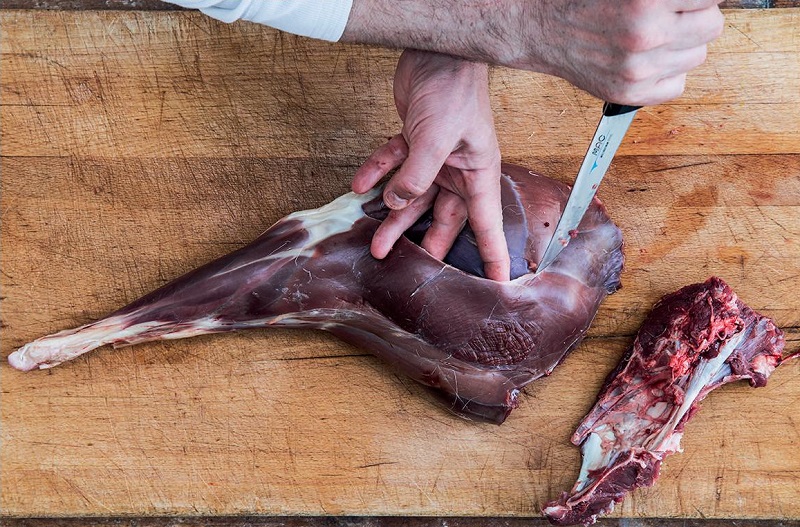
Slice all the way along the knuckle and outer thigh. Insert your fingers into the cut and lift the meat while gently separating the outer thigh from the knuckle. Use the knife where necessary, and additionally insert your fingers into the cut: Try as much as possible to separate the knuckle and outer thigh from each other by “pulling” the meat apart where it is possible.
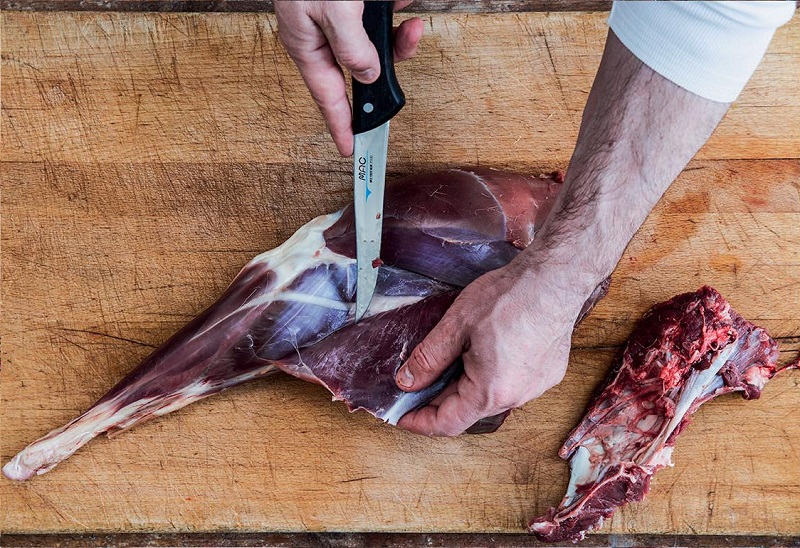
Continuously pull on the meat so you can see what you’re doing while slicing the outer thigh free from the shank, which is now visible. Continue slicing along the membrane/boundary of the outer thigh and avoid cutting into the meat itself.
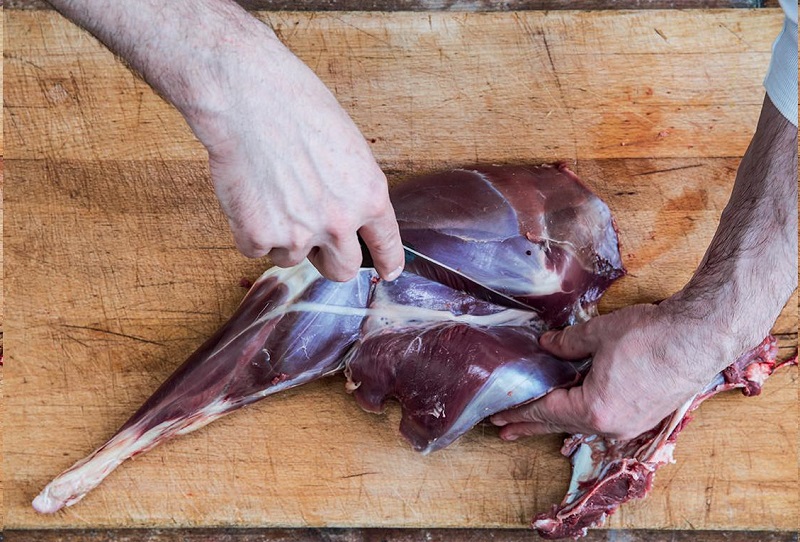
Continue to free the outer thigh: Make a few short cuts at a time and continue to slice including the sirloin, which is still attached to the outer thigh. Let the fingertips and knife work for you by pulling the meat free when possible, and only slicing with the knife when necessary.
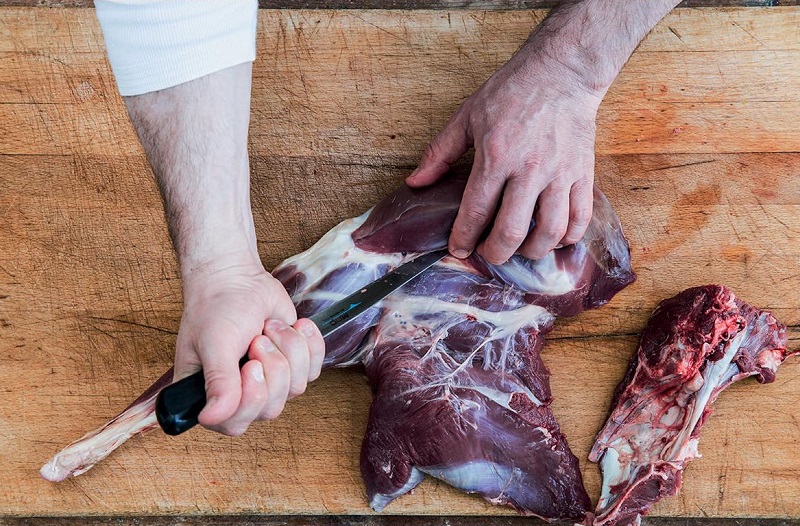
The knuckle must now also be freed from the leg so that the femur bone comes fully into view.
Feel where the bone lies. Here, insert the knife’s tip and slice along the bone while lifting the meat aside with your fingers: The femur bone will now become visible. Carefully slice the knuckle free from the femur bone, and continuously run the knife as close along the bone as possible.
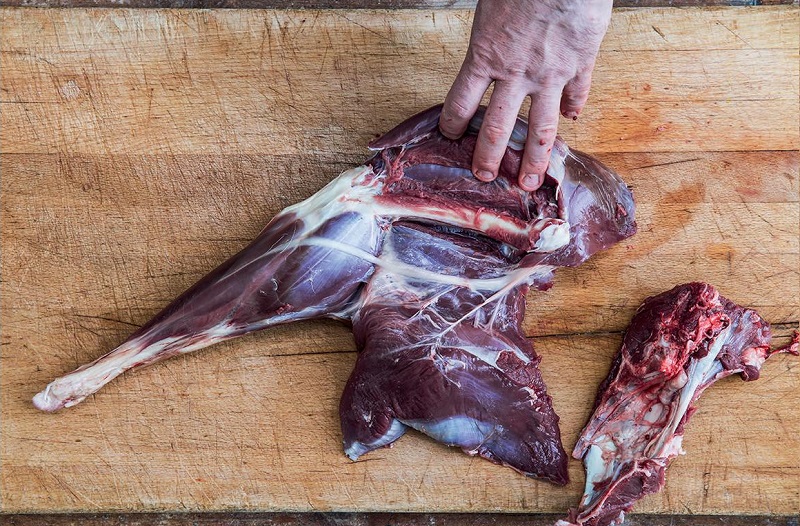
Continue to slice around the entire femur bone and ball joint until both are completely exposed. Scrape off any remaining meat on the bone with the knife so that this meat is not wasted.
Now grab the exposed femur bone with one hand.
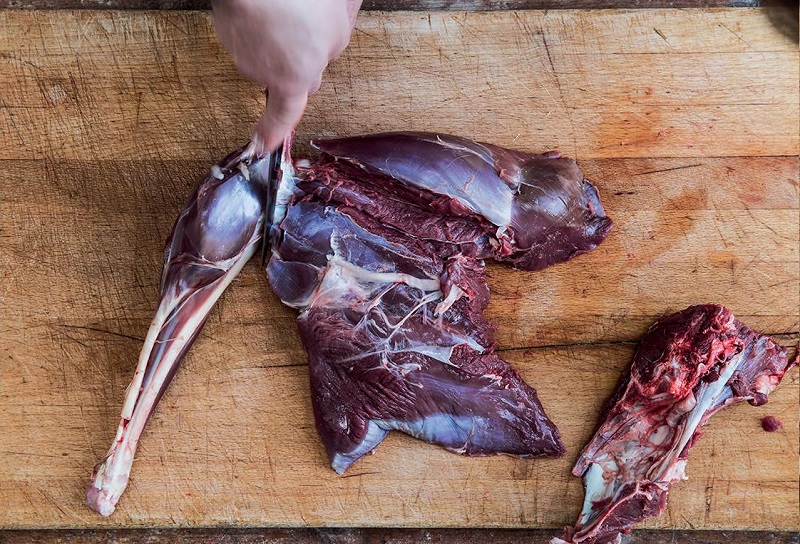
Pull well on the femur bone while cutting the shank, and thus the femur bone, completely free from the knuckle.
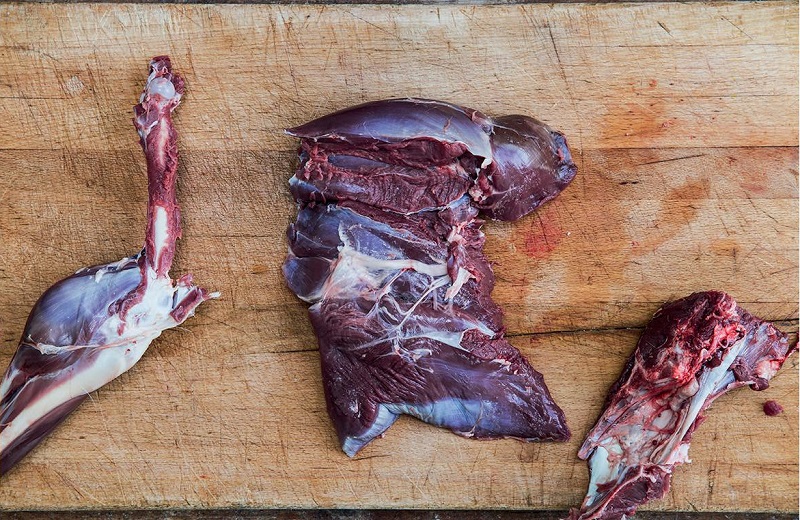
The shank and femur bone are now separated from the knuckle and set aside. The shank is typically used for osso buco.
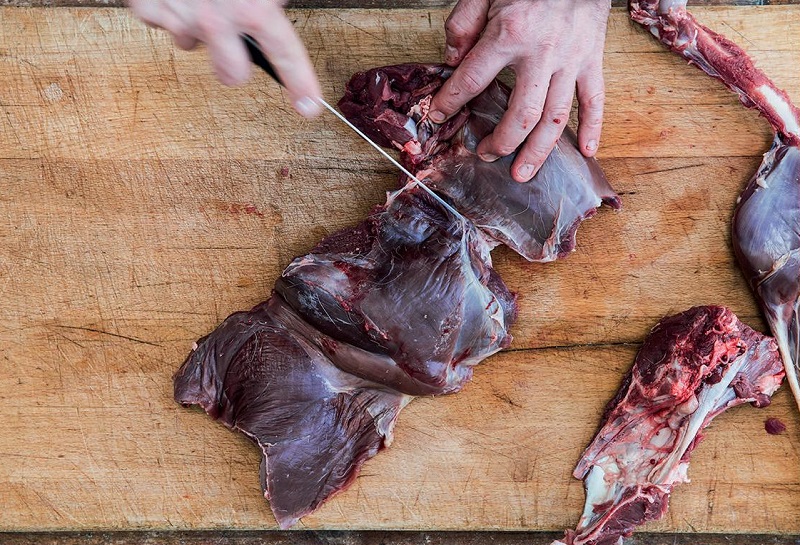
Now separate the knuckle from the inner thigh: Again, carefully make small cuts between the knuckle and inner thigh by constantly observing where the membranes separate the two. Pull the two pieces of meat apart when possible.
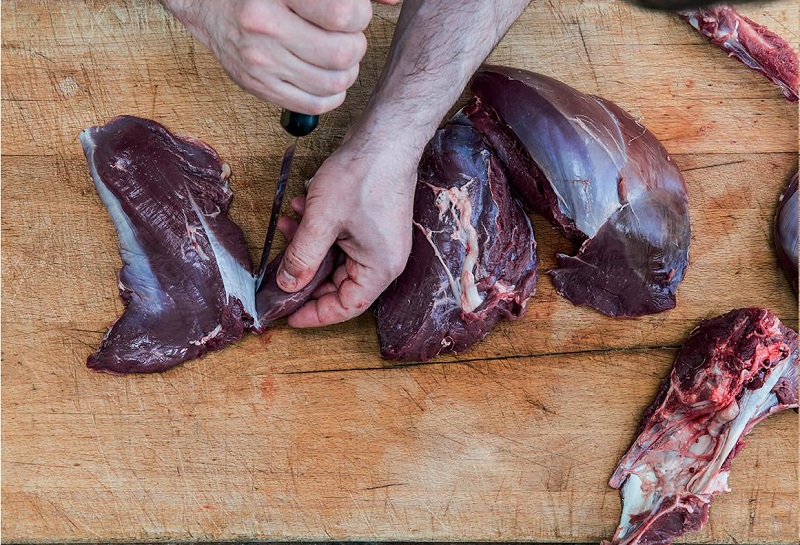
Carefully slice the sirloin free from the outer thigh. Again, cut into the natural membrane and pull the meat free when possible.
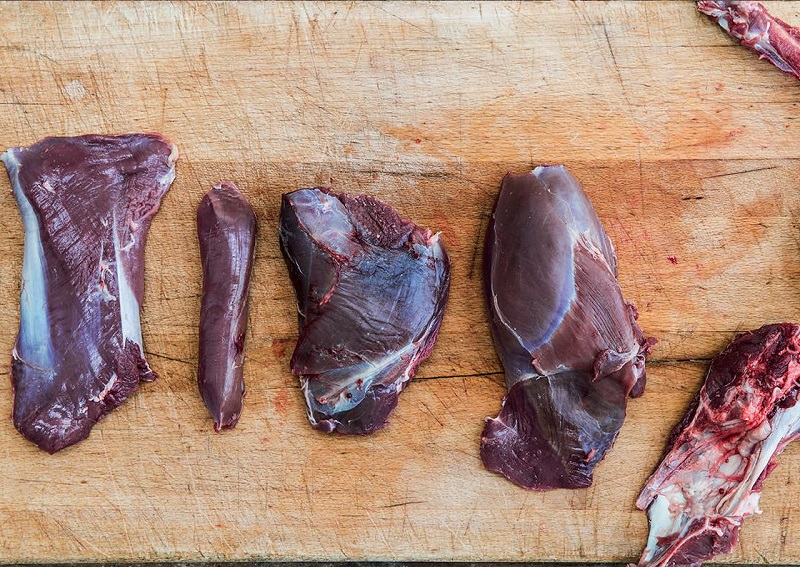
You are now left with the 1) outer thigh, 2) sirloin, 3) inner thigh, and 4) the knuckle with the thick flank placed at the bottom.
The outer thigh is typically cut into smaller steaks or made into ground meat. Additionally, the outer thigh is suitable for stews and slow-cooking in either the oven or a pot.
The sirloin, as you see, is a completely genuine piece of meat, very tender. The sirloin can be perfectly roasted as a whole steak or prepared by boiling in brine, after which the salted meat is used for sandwiches. It is also suitable for being braised or boiled and used for carpaccio.
The inner thigh is often seen in the supermarket’s refrigerated section in the form of roast beef or the smaller so-called “minute steaks.” The inner thigh is also suitable for tartare and goulash. The inner thigh is also seen as very thin slices of raw marinated meat for carpaccio.
The knuckle can be cut into smaller pieces and used in a wealth of stews like traditional beef stew.
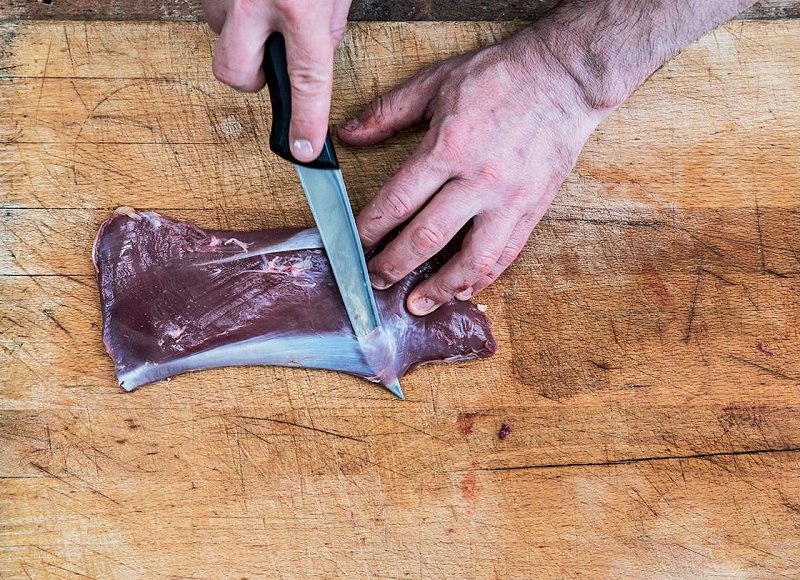
Take the outer thigh and trim it for membranes, loose meat, and any fat.
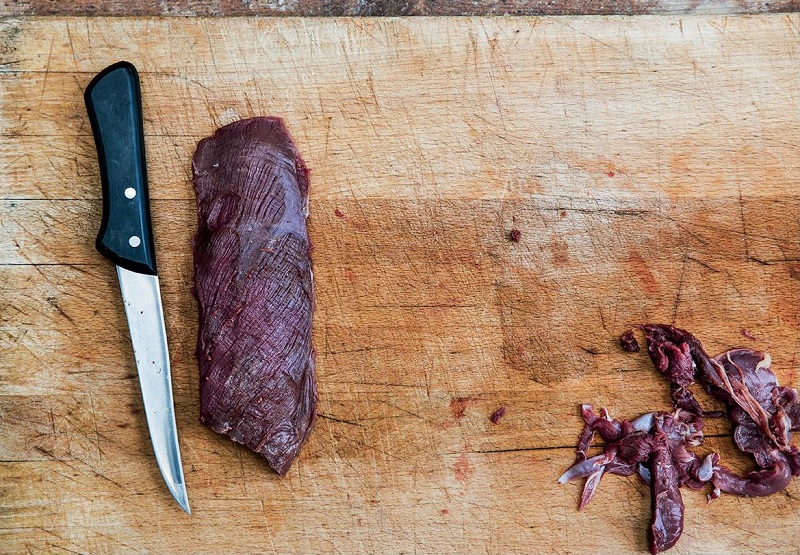
You are now left with a fully trimmed outer thigh ready for preparation.
Can Roe Deer Be Cooked in Sous Vide?
The meat from the venison leg, or game leg, is very lean, which makes it easy to overcook and become dry and boring. This would naturally be a shame, for obvious reasons such as the taste experience, but not least because venison leg is a relatively costly raw material.
It can therefore be advantageous to cook the venison leg gently and at relatively low temperatures, and here sous vide is an ideal cooking method to use.
It is important to keep in mind that very tender cuts can be easily overcooked in sous vide, giving the meat a soft, mushy texture that can have a hint of metallic or liver taste. Here, tender game should be cooked at lower temperatures, while tough game is cooked at slightly higher.
We go through here the standardized temperatures for both tender and tough game, depending on your desired preparation.
Water Temperature for Tender Game
- Rare: 53-56 °C
- Medium rare: 57-60 °C
- Well done: 61-65 °C
Water Temperature for Tough Game
- Rare: 58-60 °C
- Medium rare: 61-65 °C
- Well done: 66-80 °C
In conclusion, as with all other meat cooked in sous vide, the meat should have a good, crispy crust, whose taste is a sublime counterpoint to the rich game flavor. The crust reduces any liver taste that may have developed.
There are therefore several advantages to using the sous vide method for preparing venison leg, such as having full control over the desired result while enhancing the natural game flavor.
However, the downside may be that sous vide preparation cannot hide any possible metallic/liver aftertaste, as a hard grilling does.

We have the pictures from the book: “Walk on the Wild Side“.