Servings: pcs.
Turtle Cookies
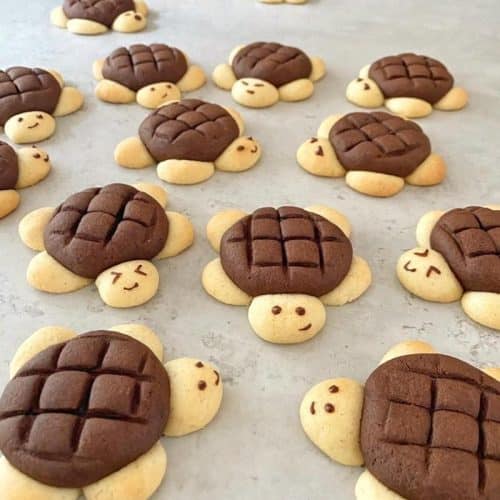
A perfect weekend project, don't you think?! And they taste quite delicious! A simple and perfect shortcrust pastry cookie with vanilla and cocoa so everyone can join in.
Equipment
- Kitchen Scale
- Bowl
- Oven
Ingredients
- 300 gram Wheat Flour
- 150 gram Powdered Sugar
- 150 gram Butter cold
- 1 pinch Salt
- 10 gram Vanilla Paste or vanilla sugar
- 1 pcs. Egg
- 5 gram Water cold - up to 2 tsp.
- 10 gram Cocoa powder for the dark dough
- 8 gram Wheat Flour for the light dough
Garnish
- 5 gram Dark chocolate
Instructions
- Crumble the cold butter into the flour, powdered sugar, vanilla, and salt until you get a sawdust-like consistency.
- Add egg and water and quickly knead the dough together until combined.
- Do not over-knead the dough!
- Divide the dough into 3 equal parts, then combine two of the parts again, so you now have a small portion (1/3 of the dough) and a large portion (2/3 of the dough).
- Add 1 tbsp of wheat flour to the small portion and quickly knead it together.
- Add 2 tbsp of cocoa to the large portion and quickly knead it together.
- Chill the dough for about 30 minutes to make it firmer and easier to work with.
- Divide the light dough into 14-16 balls (approx. 15-16 grams) and roll 5 smaller balls from each light dough ball. These will be used as paws and head.
- Divide the dark dough into 14-16 balls (approx. 30-32 grams) and roll them round. Flatten them slightly and use a wire rack or the back of a knife to create a turtle shell pattern, then place a shell on top of the paws and head.
- Bake the turtles in the oven at 180 degrees Celsius (356 degrees Fahrenheit) conventional oven for about 15-17 minutes.
- Remove the cookies and let them cool completely.
Decoration:
- Melt the chocolate and use a toothpick to draw eyes on the turtles.
- Let the chocolate dry and harden before serving!
- Enjoy making them