
Recipe for homemade mars ice cream bar
This is arguably the most iconic chocolate bar in the world in a refreshing, cold version: Homemade Mars Ice Bars!
Homemade Mars ice bars are super easy to make yourself, and they don’t require an ice cream maker at all.
Mars ice is better than the chocolate bar!
It’s not often that a chocolate bar is actually surpassed by its ice cream variant, but if you ask me, that’s precisely the case with the classic Mars bar.
It probably has to do with the fact that the chocolate bar is very “sweet in sweet” – it’s as if the fluffy, sweet nougat filling combined with the sweet caramel sauce and the (yep, you guessed it) sweet, surrounding milk chocolate lacks something to become truly, truly good.
I would venture that few people can consume more than a single Mars bar at a time.
What’s the deal with Mars ice cream?
Mars ice cream takes all the best aspects of the chocolate bar and turns it into a bar that suddenly tastes like more than one! Ice cream just makes the tasting experience much more refreshing and delicate.
Most people have probably encountered Mars ice cream, and I have yet to meet anyone who doesn’t think that Mars ice cream is especially delicious.
Caramel and ice cream generally pair phenomenally well.
The Danish weather is Mars ice cream weather
I certainly don’t limit my ice cream intake to the summer months, but warm summer weather is inextricably linked with ice cream.
Since the Danish summer isn’t completely over yet, it’s still very fitting that many of us still need something to cool down – and the answer is ice cream! 😉
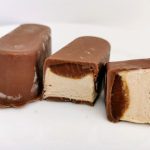
Homemade Mars Ice Bars
Here, I’ve based the recipe on my Mars ice cream balls, but instead molded them in more “bar-like” silicone molds to give an experience that resembles the traditional Mars ice bar more closely.
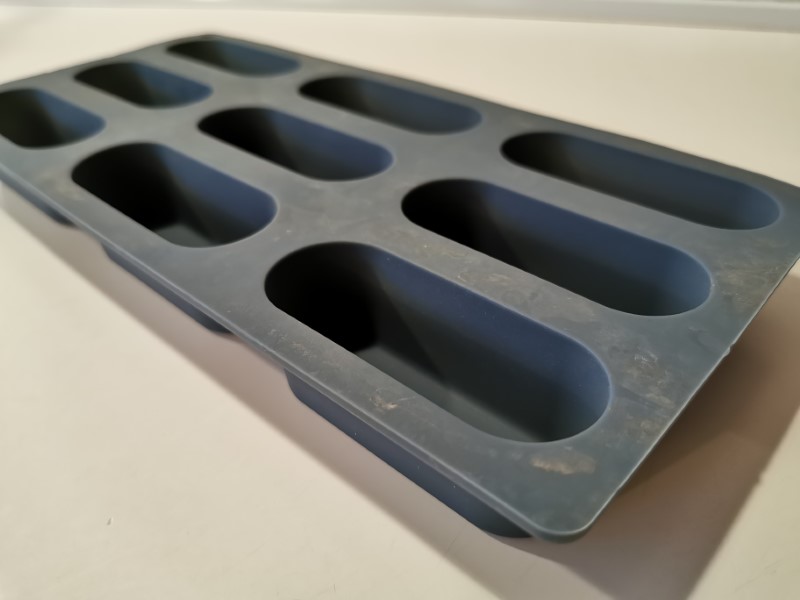
My silicone molds are about 7-8 centimeters in length and approximately 3 centimeters in height and width, and I got 9 Mars ice bars out of them—just so you can compare with the molds you have available.
In this recipe, I use a whole can of condensed milk to make the ice cream itself, as it’s a bit tricky to save a “leftover” for later.
This means that the recipe actually yields quite a large portion of ice cream—about double the amount needed for the Mars ice bars.
Therefore, you can choose to make only half a portion of the ice cream itself, as it would actually be enough – or you can do as I did and use the excess ice cream to make some super delicious homemade ice cream sandwiches!
For example, you can make these ice cream sandwiches where the bases are made of chocolate roulade, or you can try my other homemade ice cream sandwiches with round chocolate biscuit bases.
Both are incredibly good.
Have fun making your homemade Mars ice bars!

Ingredients
Chocolate Shells
- 350 gram Milk Chocolate chocolate buttons
Caramel Sauce
- 50 gram Water
- 90 gram Sugar
- 50 gram Cream
Ice
- 500 gram Cream
- Condensed milk a can
- 200 gram Milk Chocolate chocolate buttons
Instructions
Caramel Sauce
- Take a pot.
- Pour sugar into the pot.
- Place the pot on the stove and turn to medium heat.
- Do not stir the sugar during this process, just let it sit and melt on its own.
- As soon as the sugar has melted, add the water and immediately remove the pot from the heat.
- Let it stand and simmer for about 2 minutes.
- Then place the pot back on the stove.
- Let it boil together.
- Then add the cream to the now combined sugar and water, and once again remove the pot from the heat.
- Let it simmer again.
- Once the bubbling has subsided, place the pot back on the hot burner.
- Let the mixture simmer for a couple of minutes until it creates a thick caramel sauce.
- Find a piping bag.
- Pour the hot caramel sauce into the piping bag.
- Seal the piping bag with a clip and place it in the refrigerator for 60 minutes. In the meantime, proceed to the next task: the chocolate shells.
- Find your silicone mold.
- Take a bowl and pour the chocolate buttons into it. If you only have chocolate bars, it equals 250 grams of milk chocolate.
- Place the bowl in the microwave for 40 to 60 seconds.
- Stir well to ensure the chocolate is completely melted.
- Lay a piece of parchment paper on the table.
- Distribute the melted chocolate into the silicone molds. Make sure all the sides are covered. Let the excess chocolate drip onto the parchment paper.
- Peel the excess chocolate off the parchment paper and place it into a bowl - we will need it later. If, on another occasion, you don't plan to use the excess chocolate, just put it back into its original bag. That way, it can be stored for another good time 🙂
- Place the silicone molds in the freezer. Meanwhile, start making the ice cream for your Mars Ice Cream Bars.
- Take a bowl and pour the chocolate buttons into it (this equals 150 grams of milk chocolate in bar form).
- Place the bowl with the chocolate in the microwave.
- Let the microwave run for about 40 seconds, then stir the chocolate until it is fully melted. Only give it a few more seconds at a time if you deem it necessary - the chocolate must not get too hot.
- Set the bowl aside to cool and proceed to the next step.
- Open the can of condensed milk.
- Find a bowl and an electric mixer.
- Pour the cream into the bowl and whip it to a light foam.
- As soon as the whipped cream reaches a consistency where small "peaks" or "waves" form on the surface, add the condensed milk and the slightly cooled chocolate.
- Whip everything together for an additional 2 to 3 minutes.
- Turn off the electric mixer.
- Now take a spatula and fold the ice cream mixture until it is uniform.
- Take a piping bag and pour the ice cream mixture into it. Close it with a clip so you can put the bag down. Now you are ready to assemble your lovely Mars Ice Cream Bars!
- Take the piping bag with the cooled caramel out of the refrigerator.
- Remove the silicone molds with the hardened chocolate shells from the freezer.
- Now pipe a bit of caramel into each chocolate shell, filling the chocolate shells about 1/3 full with caramel.
- Take the piping bag with the ice cream mixture and pipe the ice cream on top of the caramel in the chocolate shells. Fill the shells, but remember to leave space for a final, thin layer of chocolate (about 1 millimeter thick).
- Before pouring the final layer of chocolate over the ice cream mixture, place the silicone molds back in the freezer for 60-120 minutes to allow the ice cream to set.
- After the 60-120 minutes have passed, melt the remaining chocolate from earlier. Make sure to stir out all the lumps until melted.
- Remove the silicone molds with the now frozen ice cream bars from the freezer.
- Seal the chocolate shells with a layer of the melted chocolate.
- Wipe the excess chocolate off the silicone mold and place it back in the freezer. Let it sit for at least 8 hours.
- Enjoy your homemade Mars Ice Cream Bars whenever you need to cool down in the summer heat - or when you simply crave a little extra, delicious self-indulgence!

